Have you ever wanted to capture a piece of jewelry on a beautiful white background, or nice gradient like the one above, which shows shadow and highlights your piece? There are many articles available on the web about lighting set ups and on camera tips. This blog post focuses on post processing.
As I was learning how to use my camera to photograph jewelry, I tried many different methods for lighting my set, different backgrounds such as paper ramps, light boxes, etc., but still wasn't happy with the results. Why? I kept seeing grey instead of a nice, bright white which would fit nicely with my website, Etsy and Google search results. No matter how much light I used, how perfectly my white balance was set or how I would use reflectors to bounce light back into the set, grey would still be present in my photographs. I began to play around with post processing using several free editors and learned about adjusting the brightness values in a photograph's histogram. Over time, I bought Photoshop Elements (roughly $70) as I have found their Levels tool to be the quickest for processing many photos in a session.
The writers at Cambridge in Color have done an excellent job detailing the technical aspects of what I'm about to show you in
their Photoshop Levels tutorial. I'm going to keep things simple and just walk through using Levels which is Photoshop's tool to do this. At the end, I've also included an example from Photoscape, a free photo editing tool.
Step 1: Open the Levels Tool
Open your
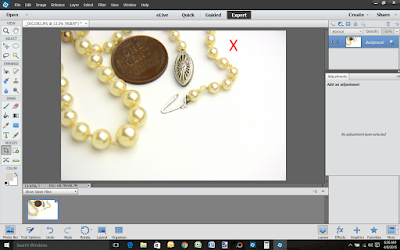
UNCROPPED photograph in 'Expert' mode. Before cropping your photo, select Enhance --> Adjust Lighting --> Levels... from the menu at the top.
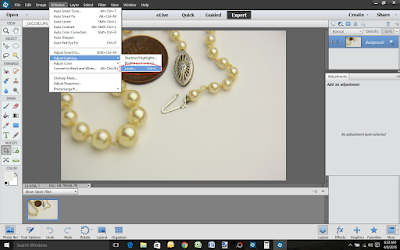 |
| Selecting the Levels Tool |
Step 2: Set the White Point
Once the Levels Tool is open, the next step is to find the best white point in the photograph. To do this, select the Set White Point eyedropper in the Levels Tool (your mouse pointer will change to an eyedropper). Now, click on a spot of white in your photograph. The tool will adjust the background to the white point you've selected and will brighten the background, but leave the object in tact. Note: you may have to try several spots in your photograph to get 'just the right white point,' so don't get frustrated if your photo doesn't look right the first time. Simply select Reset in the tool and try again.
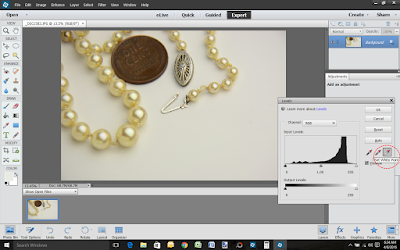 |
| Selecting the Set White Point Option |
Note: another option available to you at this point is to adjust the histogram by sliding the pointers just below the histogram image to adjust the white, midtone and black values. I like this option for fine tuning, but have found the simple Set White Point eyedropper the easiest to use in my process.
Here are a couple of examples showing different results when the white point is selected from different areas of the photograph. My light source is aimed from the right side of the photograph casting nice shadow to the left of the necklace. When selecting an area of shadow, the light in the photo blows out and will diminish the object in the foreground.
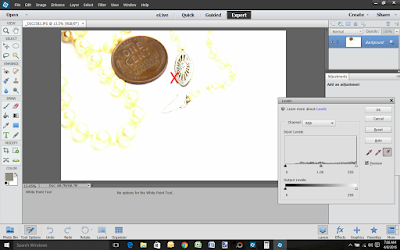 |
| White Point Set in an Area of Shadow |
Here is another example of selecting a white point that isn't in a direct shadow, but further away from the light source. This looks pretty good, but the penny and pearls are a little off color.
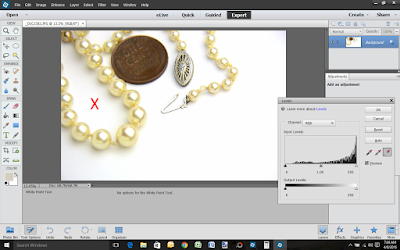 |
| White Point Set Away from Light Source |
Here is the photograph I like the best. I ended up selecting a point just to the right of the pearls to capture the light without a shadow cast. It still has some grey edges, but this is okay because we're not quite finished yet.
 |
| White Point Set in Area Without Shadow Cast Near Light Source |
Step 3: CROP!
Once the subject is a nice, true color and your background is mostly white, it is time to crop the photograph to select just the right area for display. Here, I've cropped out the grey corner on the upper right and zoomed in so the gold content mark on the clasp is visible.
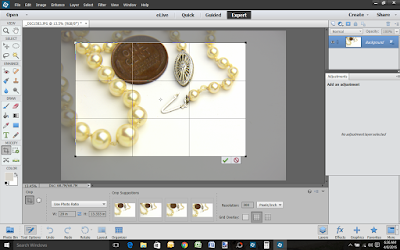 |
| Using Photoshop Elements Crop Tool |
Step 4: Enjoy The Fruits of Your Labor
Here is the final results. A nice product photo showing true color of the pearls on a nice, bright white background. Leaving a little bit of shadow in photographs adds a touch of reality to the product being featured as well. Since customers cannot touch and feel our products online, anything we can do to provide a sense of weight and depth helps close a sale.
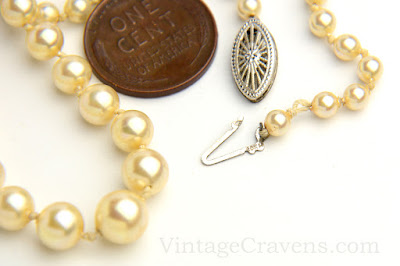 |
| Final Result |
I hope you've enjoyed this quick tutorial and would love to hear your tips and tricks for white backgrounds.
Happy Day!
Chris
P.S. Many photo editors have an option to adjust the histogram. To find them, look for words like 'histogram,' 'curves,' and/or 'luminosity.' For those who take photos on their phones, a reader recommended Photoshop Express and Be-Funky Photo Editor and Collage Maker. Here, I'm going to walk through how to use a free photo editor for Microsoft computers called Photoscape. In Photoscape, there are two ways to adjust values in this software: by changing the Luminance Curve or by Brightening the photograph.
To change the Luminance Curve, select the down arrow next to the Bright,Color button, then select the Luminance tab. Then, drag the top point of the histogram to the left to brighten the photograph. This option will generally keep the subject colors closer to true. Try moving it to different places to see how the effect changes.
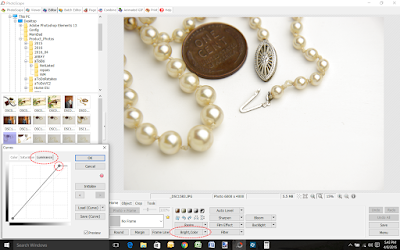 |
| Adjust the Luminance Curve in Photoscape |
To brighten the photograph, select the Bright,Color button, then move the Brighten slider to the right. This option is very easy to use, but will often wash out the subject as shown below. Try moving some of the other sliders to see how the effect changes.
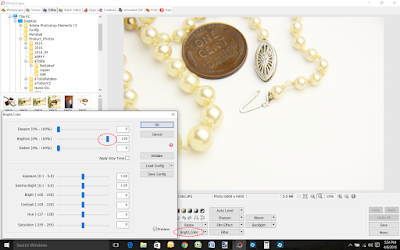 |
| Change the Brightness in Photoscape |


