My photography and jewelry making journey. Please visit the Vintage Cravens blog for new product releases, outfit posts, shop updates, etc.

Tuesday, March 1, 2016

Planning a Booth for Summer Shows

My Table at Heritage Ladies Birthday Bash, Fall 2015
I have to admit I'm a little bit out of my comfort zone. I have had an online presence on Etsy for a few years and feel very confident in the art of selling online, but in person, well that's another story.

Last fall, I had a wonderful opportunity to set up a table at our church's annual Ladies Birthday Bash. It was a safe way to dip my toes into the water of selling in person. At the time, I did have a very simple locket necklace I had made, but the majority of my booth featured antique and vintage jewelry. It was a lot of fun and I learned a few things along the way.


  • People LOVE the 'over the top' pieces like 18K gold Victorian rings, but they tend to BUY simpler, less expensive jewelry at shows like this. 

  • Standing IN FRONT of my table instead of behind it seemed to feel more comfortable for both the customers and myself. I knew many of the ladies at the event, but there were new faces I had a chance to meet as well. 

  • People love to hear STORIES about the pieces - the era they are from, what made them special, how I got them, etc. 

  • Having products at multiple SIGHT LINES was a great way to get people to browse my jewelry. 

  • Packing SIMPLY was critical for my morning. Many of the other tables in the room spent 1-2 hours being set up by their owners. This set up looks complicated, but it took me a half hour on each end of the show. How did I do it? Everything was already boxed up and ready to go with the exception of a few pieces you see on necklace holders and the rings I had in nice wood boxes. 

  • LIGHT is a great way to draw the eye. I used a few book lights strategically placed to light up sections of my table. The light in the auditorium was nice and bright, but this added a little something extra to my jewelry. 

  • I used a 6 foot folding table provided by the church. I found that by RAISING the table just 6 inches with bed risers and draping it with a nice restaurant grade tablecloth added understated elegance plus lifted my items up so people didn't have to bend over to see the things directly on the table. 


Sketches for an Outdoor Booth

So, why am I out of my comfort zone? Two reasons: I'm going bigger AND I'm bringing my new line to a couple shows this summer! When I learned about people buying simpler, less expensive items last fall, I knew I needed to think a little differently about how I would do summertime pop up markets. At first, I thought I would just wait until I wasn't working my day job because I knew it would be a lot of work, but then I realized I wanted to start getting out there now. Not a show every weekend, or even every month, but at least 2-3 times per year. Thankfully, my sister is also starting to think about selling things she makes (see my blog post about her sweet signs here), so I don't have to fill up a 10x10 spot with my jewelry alone, but it is still a daunting task. 


Score! Vintage Folding Screen

See this cool thing? It's a vintage folding screen with three panels - a garage sale bargain I picked up last fall as a 'just in case I want to sell at local venues' option. It's huge! It will become an integral part of our booth. I'm not a big fan of painting over beautiful wood like this, so I'm leaning toward using peg board panels hung over the top as the backdrop for our products. I've sketched up a bunch of ideas, but we'll see where things land. I have about 15 notecards stacked up now for not only organizing our booth, but how I want to package my line to make it work for both shipping from my online store to displaying in the booth to easy transport. Our goal is to set up/tear down within an hour or less, the whole 10x10 space. 


Wood Jewelry Displays

One thing I am thankful for is a husband who has woodworking and building skills. Mark is teaching me how to make things myself. I started with these simple wood displays for necklaces. I'll be making them not only to display a few necklaces in our booth this summer, but to sell as well. I am looking forward to this next chapter and am especially thankful to be sharing the adventure with my sister, Sherrie. Our Mom is also going to be helping us with the booth since she will be back up here this summer. A family affair!!! 

Here's to a fun summer,
Chris

P.S. I couldn't leave you without a few photos of my favorite booth and display ideas. I love the ingenious ways people come up with to display their wares, but especially look for simple and quick set up. 

Earring Display via Weggart
Love the idea of hanging them sideways to save space and transport easily


Photo via Jessica Smutek
Quick and simple way to display bracelets, also easy to pack


Image via BlackForestCottage on Etsy
What a great way to transport and display jewelry


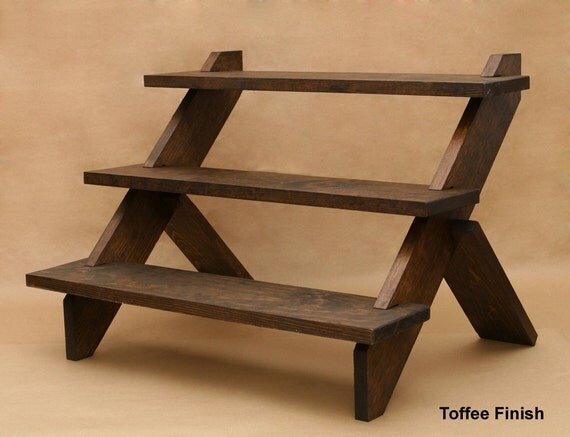
Photo via USaveCo on Etsy
This sweet three tier shelf comes apart for extremely easy transport


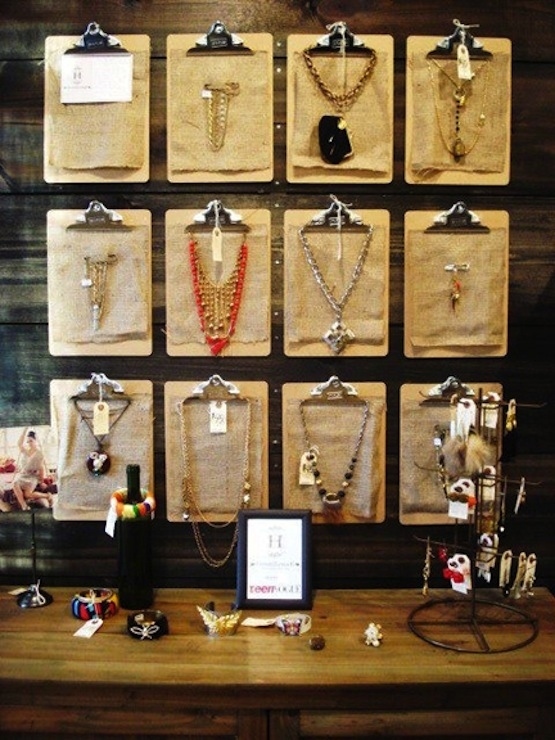
Good Stock Photo via San Francisco Girl by Bay
See those boxes on the wall? A little bigger and they would work for transport AND display


Photo via Fixtures Close Up
Love this - a vintage valise converted to sell bracelets (this site has a ton of great ideas)


Photo via Buzzfeed
No busts to display your necklaces? No problem! Simple, easy to transport & pack


Photo via Grit Goods
Shutters serve to keep people from tripping over poles AND extra display space


Photo via Lil Ruby
An old drawer organizes and transports earrings


Image via Matome Naver
Good in so many ways - baskets to display and transport packaged necklaces, earrings
A few key pieces hung/displayed to catch the eye
Same size crates to add interest and transport the larger display pieces
Greenery and flowers to ad color


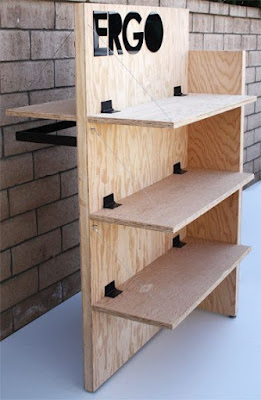
Image via MSquared on Etsy
Nice portable shelf unit for display


Photo via Doug Schmitt Antiques
Completely impractical, but I couldn't resist - antique dental cabinet!


See my Pinterest board for jewelry storage and display ideas for many more options...

Thursday, February 25, 2016

Build a Line Challenge 2016 - The Journey Progresses


Art Nouveau Necklace by Gorges Fouquet Jewelers, Designed by Alphonse Mucha
Circa1905 (photo via Project Wedding)

When I started the B'Sue Boutiques Build a Line Challenge (BALC) 2016, I discovered relatively quickly my design influences lie in the beautiful, undulating designs of the Art Nouveau movement, yet I am also drawn to the simplicity found in Arts and Crafts designs. Many of the colors used at the turn of the 20th century are soft and mutable, like the colors found in nature from which both artistic movements find their roots.


Arts & Crafts Necklace by W. H. Haseler Jewelers, Designed by Archibald Knox
Circa 1902 (photo via Victoria & Albert Museum)


One of the most enlightening exercises we undertook in this portion of the class was to spend time learning about designers and their influences in the better part of the twentieth century. I was amazed to find the spirit of the Art Nouveau and Arts and Crafts movements carried on in designs by the likes of Miriam Haskell and Coro. I also enjoy beautiful Victorian mainstream designs and their ornate patterns. Modern designers like Alexander McQueen carry elements of Victorian design in their lines today.

Alexander McQueen Spring 2016 Collection, Coro Rhinestone Necklace, Miriam Haskell Demi Parure
Photos via Vogue, Treasures of Grace, and Aged and Opulent Jewelry


At this point in my jewelry career, I feel very confident in sourcing and selling antique/vintage jewelry on a small scale. I am developing jewelry making skills and would consider myself to be a 'hobbyist' with aspirations to grow my business into a full scale design and production venue. I truly enjoy the detail found in beautiful antique pieces and am honored to carry some of the thought processes of those who have gone before me into my first line. With All Jeweled in White, my initial focus is on simple design with a definite nod to the past. I am using high quality components in rich antique brass, Czechoslovakian crystals and glass pearls along with a few fun surprises like silk Sari ribbon and a new patina I am developing. Simple, yet elegant, All Jeweled in White is my step into the 'maker' category of a jewelry business.

A Few Components for All Jeweled in White


This is the second in a three post installment for the BALC 2016 blog hop (post 1 is available here). Our next post will be April 1, 2016, so please stop back for a visit.

Cheerio!
Chris


BALC 2016 Blog Hop

Be sure to visit the talented students in the BALC 2016 class. I am amazed at the amount of work these talented ladies have been able to accomplish in such a short amount of time.


My Jewelry Logo


I am learning so much in our BALC class this year. One of the suggestions I really like is signing pieces we make. The name 'Vintage Cravens' and the distressed Cross have been with me since the beginning. I wanted something simple for jewelry tags and hand signing, so I decided the VC initials and Cross were the most important things to me as a brand statement.


Of course, when I looked at my new simple logo in conjunction with my Etsy shops, I realized I needed to update the headers there as well as on social media to convey my new logo. I ended up with the combination of text, logo and design elements above. I like how the design gives an 'antique' feel, yet still modern with the placement of my logo in the center.

Here's to new frontiers!
Chris

Tuesday, February 16, 2016

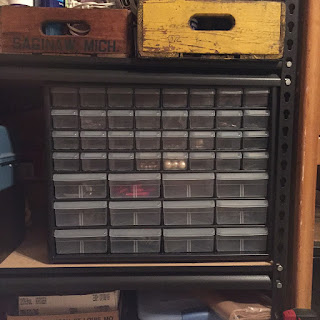
Organization Station!


I am so happy my Akro-Mils organizer unit arrived today! Reasons why I like this cabinet:

  1. It is made right here in Akron, Ohio.
  2. It is small enough for me to store on my shelving unit or move over to my workbench.
  3. It has a bazillion drawers.
  4. I am now FINALLY able to keep all of the bits and pieces for my new All Jeweled in White line organized and readily accessible!!!
Happy Tuesday!
Chris

Saturday, February 6, 2016

New Shipment of Goodies!


It has been a busy day in the workshop. I'm playing with some patinas for my All Jeweled in White line including something inspired by calcified bronze statues. I put together a few necklaces from my designs as well and am looking forward to being able to share them. In the meantime, here are a few goodies I received from B'Sue today. Some pieces from my order are in the top left corner. Everything to the right of the birds was free - yes FREE! I love B'Sue Boutiques for my supplies.

Happy Saturday!
Chris

Monday, February 1, 2016

Definitely a Splash! Robin's Egg Blue, Meet All Jeweled in White!

Grandma's Roseville Planter on My Test Background

Remember Grandma's Roseville planter? Here it is on my freshly painted background for All Jeweled in White! Read on to see what components of my new line look like plus a top secret photo tip!

I couldn't be more thrilled with the robin's egg blue color I decided to test with my new line as a potential backdrop. I love how the pearls, crystals, antique brass and silver look with it. I like it plain, but adding a few well placed props kicks things up a notch. I went through my stash of antique postcards and pulled together several that will work. Here is a good example of one with some of the components I'll be using for my line plus one with my favorite antique book and one all alone.

Some Options With My Test Background


So, what was that photo tip I promised? Well, here it is! One of my favorite things to use to bounce a little light back into photographs is plain old white foamcore propped up with hardware store clips. There are so many ways to make use of the stuff. Simply cut it to shape with a razor blade, attach a clip and you're ready to go. Another thing I've tried is to tape two pieces together to make a nice corner. This is great for bigger things, but is a little unwieldy. In the photo of Grandma's planter, I have a light source coming at about a 45 degree angle from the right plus a single white 'bounce card' on the left the reflect the light back in. That beautiful black background? Yep! Foamcore in black!

Photo Tip: Foamcore and Hardware Store Clips Work Wonders with Light!

Happy Photographing!
Chris

Saturday, January 30, 2016

A Splash of Color for All Jeweled in White?

Photos Courtesy of Color Bakery, Miss Folly, Eye Poetry Photography*

I've started making pieces for my new All Jeweled in White line and have used some of my favorite props for photographing them. I just wanted to do something a little different to make my new line pop. Some of my favorite props for VintageCravens include antique books, silver trays with heavy patina and classic white to show true color. This is my first piece in my new All Jeweled in White featuring a vintage French filigree stamping, glass pearls and crystals. My favorite background in this group is the antique songbook, but the filigree seems to blend in. The silver tray adds a touch of mystery, but again, the piece doesn't stand apart well from the background. White is always a nice choice for jewelry and what I consistently use for my vintage/antique pieces. As I said earlier, I just want something a little different to make this line pop.

All Jeweled in White, French Filigree Necklace & Earring Set


I woke up this morning and remembered this beautiful painting I saw by Heinrich Vogeler. 'Verkündigung an die Hirten,' or 'Annunciation to the Shepherds,' was painted in 1902. I love the blue in the angel's wings, the scene itself and have always related to the shepherds in Jesus birth story. Notice anything else in this painting? I did. The sparkling pearl white snow and Jesus' shining crystal star!

Photo Courtesy of Wiki Commons


I began doing some digging and realized Robin's egg blue was a staple of the Art Nouveau color palette. Inspired by the photos of the Paris doorway and peacock poster above, I began pulling together examples of this beautiful color with white and fell in love. I decided to have a look around our home and pull some of my favorite pieces, old and new, out and hold one of my All Jeweled in White Birds pieces against them. I really like how my Grandma's Roseville pottery planter looks and decided to mix up a batch of acrylic paint to find the right mix.

A Peek at a Piece from All Jeweled in White, Birds Against Grandma's Planter


I'm really happy with the colorway I was able to mix with some blue, green and black paint I had on hand. Mark has cut a board for me and I'll be working on this today. Stay tuned to see how this turns out as a potential photo background for All Jeweled in White!

Happy Saturday!
Chris


* Color Bakery Les Paons I Art Nouveau Peacock poster available here, Eye Poetry Photography Paris Door fine art print available here.